9 January 2013

Its Pi-day! (Part 2, Plugging in and powering up)

So, My bits arrived, I've made an SD card that should be usable.

Lets start by popping the Pi in the case you have selected, in my case the board simply clips in, no tools required.


Pop the top on and start connecting it all up, there is a recommended order for doing this. Quickly jump over to the quick start guide for the Pi, the numbers on the picture are the order to do this:


If you follow the link, above you'll be presented with the above image, click on the image for the PDF full quick start guide with the Pi. Hopefully this will be of use.
1: Insert SD card

2: Plug HDMI lead in

3: Plug in USB components (WiFi and Keyboard/Mouse dongles)

4: Plug in Network cable (until the Pi WiFi is working)

A couple of notes at this point relevant to what I'm doing.
  • If you're planning on running a WiFi connection, you'll just need a wired connection for the first few minutes of being connected, after that, you can disconnect and go fully wifi once things are initially set up. 
  • I'm using my Pi connected by HDMI directly to my TV, so the analogue connection will be unused in my notes.
  • Finally a note about connecting power. The Pi doesnt have any buttons on it unlike a laptop or desktop computer. Because of this, there is no reset button, or power button. Powering up is by plugging in the power adaptor, turning off is by unplugging, and a reset in the event of a frozen system is by unplugging and pluggung in the power adaptor. For this reason If you are going to do anything physical with your Pi, always disconnect the power adaptor before you do anything, and reconnect last. It'll save a lot of heart ache in the long run. 
And thats it, check your SD cards and USB plugs are fully inserted, your network cable and HDMI cables are properly connected to their respective Router and TV. Set your TV to the correct HDMI channel, and get ready to power up. Plug the power connector in, and look at the screen.

5a: Power connected, and the little red LED comes on

5b: Screen shot of my Pi booting up

You should get a Raspberry Logo at the top of the screen, and a load of text rapidly spewing down the screen. Thats your Pi coming to life, wait a short while, and you'll find that there pops up a window with a few options. This is the raspi-config window, for anyone with a mildly geeky thread running through their soul, this is roughly equivalent to a BIOS on a normal computer. As the Pi has no specific BIOS, the settings here are all held on your SD card, and thats the way the Pi configures itself each time. 

So you're probably looking at a few options right now, theres a guide to what each one does here. Navigate with the cursor keys, tab key etc. Some can be left alone, some need setting up. Starting with the basic settings, switch the timezone, and locale to represent where you are. If you're in the UK, the Pi is already set for a standard UK keyboard, but there are plenty of pre-loaded options for keyboards, including both national variations, and manufacturers of keyboards. I did switch the manufacturer of my keyboard but left the national settings alone. Check boot behaviour is set to its default setting of "desktop". At this point, go to the update setting, if you feel the need to update, this will need the use of the wired network cable to your router if you choose to do it.

Finally if your SD card is 4Gb or bigger go to the option that says "expand-rootfs". When you made the SD card so it could work on the Pi, the default image is a 2Gb image, this menu option will switch it about so the version of Raspbian installed uses all your SD card. It'll start throwing up a bit more text, then give you a message saying it will do this next time the Pi boots up. 

The Password, SSH, Overscan and memory split settings can all be left alone. The overclock settings are essentially up to you. Overclocking is something I'll explore when I've got some heat sinks fitted to my board as my pi seems to run at a steady 45-50 degrees C with no overclock, (this will no doubt be the subject of a future post).

Now using the tab key, move down to "finish" and allow the pi to do its thing. 

You should get a load more text flash up, then suddenly the screen will go blank. 

Don't panic, the Pi is moving from text based stuff to something a little prettier. A few seconds later, and you'll be in your desktop environment.

Next time, I'll cover getting WiFi running, setting up a few bits, and familiarising ourselves with the desktop environment.


Its Pi-day! (Part 1, Getting it all working)

My Pi bits have arrived. It was time for unpacking all the boxes, bags and other packing containers to see what I got for my money.

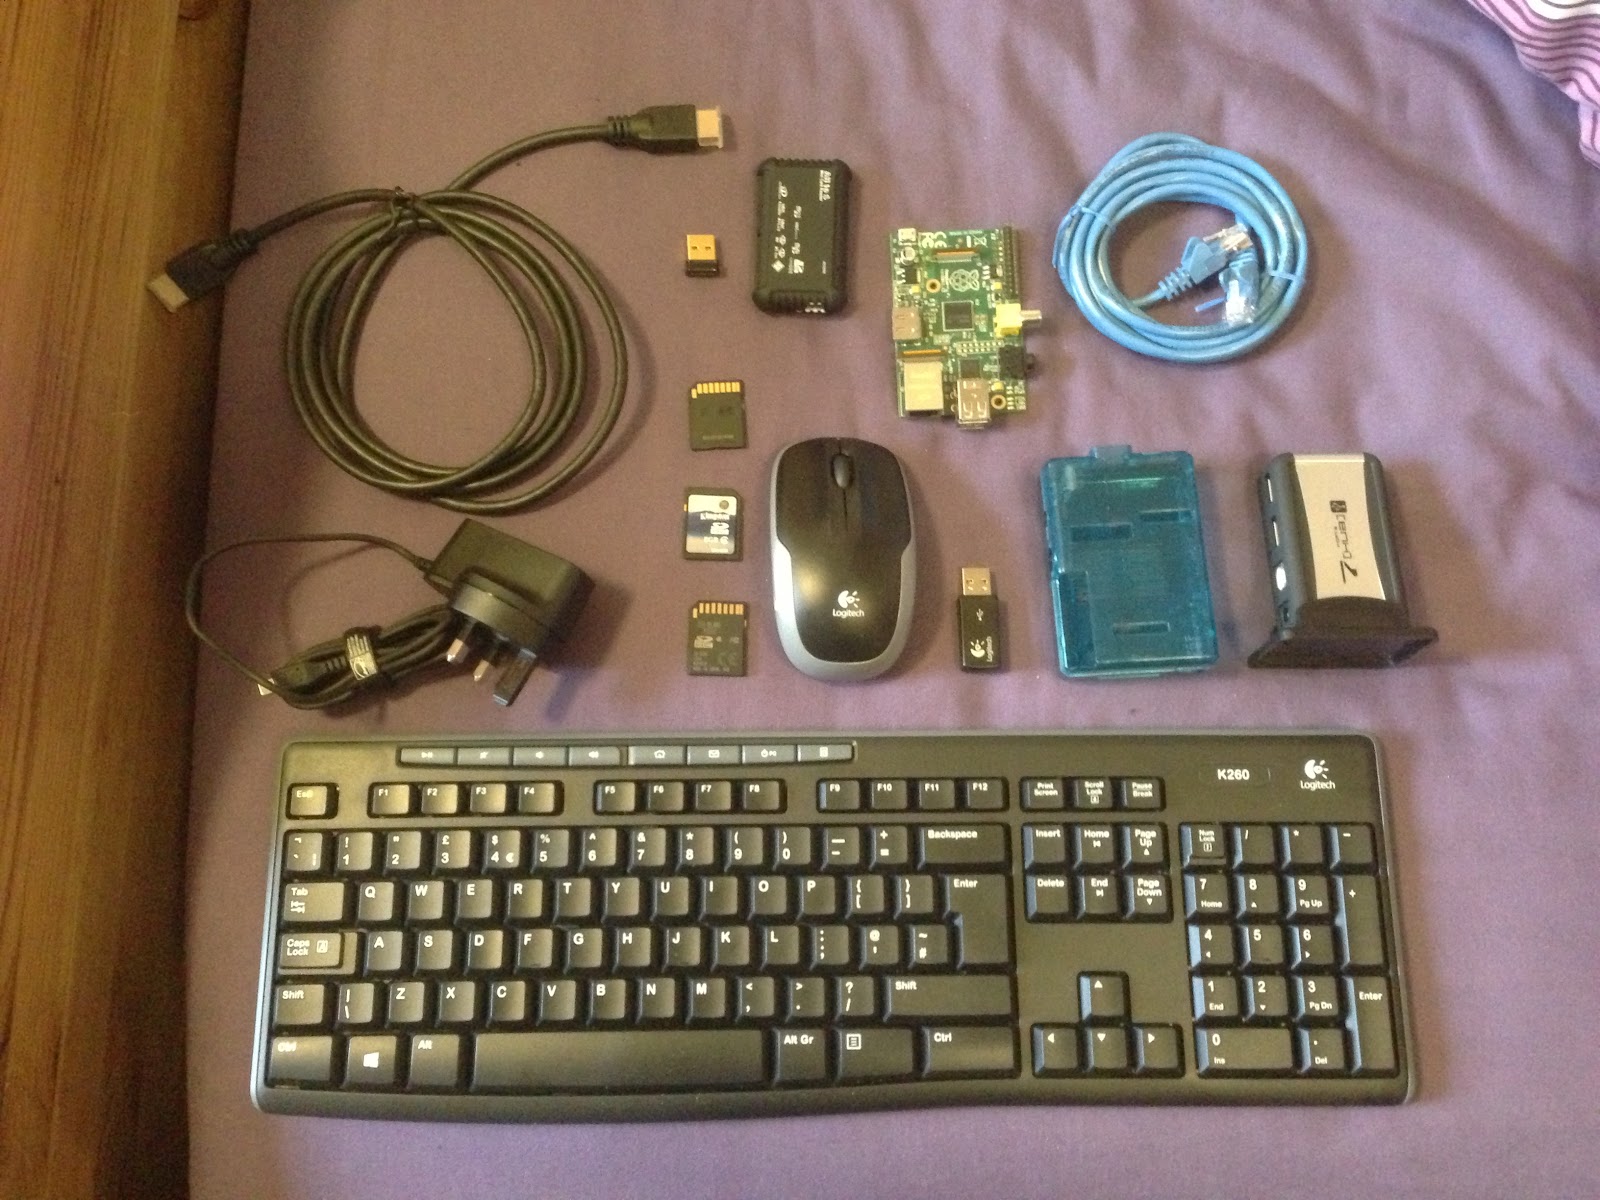
My selection of bits that will hopefully get me a working Pi

Well the Pi board comes in a very fetching pink packing/transit case, the case for the Pi looks nice, and is easy to slot together, and fairly straight forward I'll cover all this in Part 2 of this post.

However first things first, I need software and an operating system to get the Pi working. If you've ever come into contact with any form of computer based hardware, you'll know it is just inanimate and useless without its software and operating system. My carefully selected hardware is no different. It all works from the OS and software I need to place on those SD cards I've pressed into service. At the moment I dont have a usable SD card, so this is the steps I took to make it all work.

The standard operating system of the Raspberry Pi is "Raspbian". Raspbian is a version of the Debian Linux thats tinkered with specifically to run on the Raspberry Pi. You can also run other operating systems, versions of RISC OS, Windows 3.0 and other OS's have all been got to run on the Pi. This is slightly more advanced than I'm looking to do at the moment, so I'll stick to Raspbian for the moment.

If you want to do it the easy way, go trawling on eBay doing a search for "raspbian" buy one of the pre set up SD cards, plug it in your Pi and power up. You'll not need to read the rest of this posting, and you can skip to the next post about setting up ready to power up and play. But be aware you'll pay a premium for something thats fairly simple to do yourself. If you like to save money, or just like to do things yourself, then read on, its not too scary if you're willing to have a go.....

Firstly you'll need your SD card, make sure its compatible (see the link in the previous post), and has no data on it you need. The dard will get formatted losing anything on it in this process.

Setting up the SD card. 


This bit Gets a little tricky to explain, you see it needs to be done on an existing, working computer.

Why this bit gets tricky is because the instructions are different based on what operating system you have. Now my laptop is a MacBook Pro, which runs OSX Mountain Lion, so my instructions will be primarily based around OSX for the actual setup.

Windows users, would probably be best looking here, this is the page on the Pi wiki. Theres also info for OSX users if you like, but heres a quick run down on how to do it OSX style.

Its just a question of downloading 2 files, one tiny, one big. First go over to the Raspberry website downloads page. Go down to the sub heading where it says 'Raspbian "Wheezy"' and download the file from the direct download section. This is the actual OS and software you'll need for the Pi to run. You'll need to unzip the version of Raspian you download, leaving you with a big file that has the extension .img, save this for later. Depending on your download speed, you might be best leaving the computer to do its own thing while this downloads.

Next you'll need to pop over to here to download the SD card utility (currently ver 1.2). This handy little tool sets up the SD card ready to roll in your Pi. The file will download, then follow the instructions on the page.

Couple of points to note if you get difficulties:

  • It is obvious to many but less so to others, make sure your SD card is unlocked. Dont worry, its a simple thing to do, look on the side of your SD card. Theres a little switch on the side, flip the card round so you are looking at the electric contacts and they are to the top as you look at them. the switch is on the right side, check its in the upper position, to allow you to write data to it
  • If you are running Mountain Lion and try to run the SD card utility, but your mac tells you you cant run the programme because its from a third party, you'll need to change your security settings. Go to: System preferences > Security & Privacy Check if the little lock at the bottom is open, if its not, click on it and enter your password. At the bottom of the window is a bit saying "allow applications downloaded from", set this to anywhere. As a precaution, reset this back to its original setting after you have got the SD card set up.
  • You'll follow it through stages 1-6, and wait a while. If you get an error message saying: "The action “Run Shell Script (eject sd)” encountered an error. Check the action’s properties and try running the workflow again." dont worry about it. After reading the notes and looking at the authors comments this is a common problem. Your SD card is done, you can eject it as usual and procede to the next stage, get to grips with using your Pi
My next post will cover plugging in, turning on and initial setup, and getting a usable system.

Getting Synaptic, your Pi's best friend (Part 1)

Time for the first thing you'll really want to do with your Pi, add software so you can actually do things with your Pi

To add programs or packages as the linux community seem to call them the traditional way is to go into a programme called terminal, and do it by adding a string of text based commands, its a little scary for the beginner, so there has to be a better way of doing it thats a bit more point and click.

Indeed there is, its time to get Synaptic installed on your Pi. So what can Synaptic do?
  • It uses a graphical front end to make it easier to do things with your Pi
  • Find where updates are available in your version of Raspbian
  • Install the updates you select, or install all available updates
  • Allow you to search for software available for your Pi using your own specified keywords
  • Allow you to browse available software by category
  • Install everything needed to get that software running on your Pi
  • Remove software you don't need 
So if theres something you want your Pi to be able to do, Synaptic is going to be key in getting what you want to happen. To get Synaptic, you will have to enter a single line of text into Terminal. Heres how to do it:
  • Power up and boot into your Pi's desktop
  • From the icons down the side, select and open LX Terminal, the one that looks like a blank monitor.
  • Up will pop a plain text window, on the first line will be something like: "pi@raspberrypi ~ $"
  • Type exactly as written the the following, all in lower case letters:
sudo apt-get install synaptic

  • Answer 'y' to any prompts.
  • Leave your Pi to do its thang, it should be spewing text out, checking package lists, downloading stuff, then installing it.
  • When its done tap the start button.
  • Move up to "Other" and expand it.
  • Open "Synaptic Package Manager" your password is 'raspberry'.
  • And now you have Synaptic installed and running. It will take a short while whilst it does a system scan for any bits that need updating in Raspbian.

Updating your Pi

When my Pi was first set up and I installed Synaptic i was informed there were 62 updates available. This sounds horrendous, but its not really, each minor individual file that makes up your copy of Raspbian is checked. So out of all those thousands of files in your OS, 62 needing an update is quite a small percentage (less than 1%).  The update process is really easy:
  • Click the mark all upgrades icon at the top of the screen, 
  • Click the apply icon, and leave synaptic to do its thing, it will take a while to download, and install all the updates. 
  • Once the stuff is downloaded and it switches to installing select the "Automatically close this window after the changes have been applied" option.
  • Its best make a coffee while you're waiting, you can even make a sandwich if you're hungry, you'll have the time spare.
  • Once all updates are done and the install window disappears  reboot and start again with a freshly updated Pi.
Unfortunately I havent found an auto update setting so you'll have to do this yourself periodically. Next post will be a bit more about using Synaptic, how to download software that kind of thing, so you can start having a useful Pi that does more things than just browse the web.


8 January 2013

Playing with your Pi

So hopefully one way or another you've got a running Pi, so now its time to get it set up a little. Maybe you need your wifi setting up, maybe you just need to tone down the desktop background from white to something less bright. Nows the time to play with your new computer.

Note: 

The Pi is not a supercomputer, or even that high powered, sometimes a degree of patience is essential when using your Pi. If you click to open a programme, and it does nothing, just leave it alone, it will open. Trying to click to open again and again will open more and more duplicates of the same programme, and slow things down even more. Remember the pi was a cheap computer? theres a reason it gets made so cheaply, well thats because good as it is, the components on the Pi aren't high end cutting edge technology, they are tried and tested components that work well.

If you're still doubting me about patience with a computer, then go on eBay, and buy yourself a working mid 80's home computer that loads its software from an audio tape (BBC B, Comodore 64 or Sinclair ZX etc) and use that for a week. You will come to understand patience with a computer each time you try to load a game from a tape, like Elite. And your Pi will suddenly seem speedy.

A quick outline of the desktop

If you're moving over from a pre windows 8 computer, it should be semi familiar already. There are icons down the left hand side, theres a task bar at the bottom, and theres a big raspberry in front of you. Of note in those icons to the right is Midori, its one of the web browsers available to you.

The task bar

Running left to right for your use and amusement there is:
  • The equivalent of the start button in windows, this gets all the bits you'll commonly want, access to programs, settings and shutting down your Pi safely.
  • Next is the little file cabinet icon, this is your file manager, strangely enough this allows you to manage your files.
  • Then theres your web browser, in this case Dillo, it allows you to browse the internet, and look at stuff, like this blog.
  • Theres a double window icon thing that to be honest I havent fully figured out yet it just seems to minimise all open windows. Should I ever get as far as figuring out what it's useful for then I may well come back here and add all pertinent info to this posting.
  • Finally to fill up the left side is one of the genuinely more useful features in a stock OS i have come across  Its the desktop select box, as standard you get Two desktops (it is possible to add more, but this may compromise performance), so you can have One desktop for your web browsing, while the other desktop could have maybe a wordprocessor open allowing you to write out some form of document based on the highly accurate Wikipedia. You'll also notice that as you open programs, they show up as little areas of used space on the relevant desktop.
  • The middle area is dedicated to open programs on the desktop you are currently viewing. Switching desktops will switch to the programs open on the other desktop.
  • The right hand corner contains the "Panel", this is an area for system information such as time and CPU usage. Its quite customisable for what info you want to see. Lower down this page is the section on monitoring your system, and reading that should give you the idea.

Wifi setup

So the first thing you'll probably want (if you've got hold of a dongle) is your wifi up and running, so you can put your Pi somewhere less conspicuous. On the desktop you'll see WiFi Config, open it. Strangely you're in the bit you set up your WiFi. heres how to connect:

  • Click the "manage networks" tab, then click "Scan" a new window will pop up with the available networks, look for your network. Slide this window to one side, but dont close it yet. 
  • On the original window click "Add" up will pop a new window, with some text fields to fill in.
  • In the SSID field  type in the name of your network. This is case sensitive, so type it letter for letter using the appropriate upper and lower case notation.
  • In the Authentication field, select they type of encryption your network uses (WPA/WEP etc) if you're not sure, google is your friend here.
  • In the PSK field, you enter your network password.
  • Click Save and the window will disappear.
  • Now on your original window, the "Network:" box ta the top should have changed to the name of your network.
  • Click the "current status" tab.
  • Click connect, and it should run through the connection procedure.
  • When the "Status" part says completed, its all connected.
  • You can close everything its all done and settings are stored on your SD card.
  • I'd recommend shutting down, and a reboot sans network cable to confirm everythings running ok. Look lower down this page for the safe way to shut down and reboot your pi.
  • Done!

Monitoring your system

Personally I like to see a few stats to get an idea of how my computer is performing, this again is quite easy to do. The default setup includes a CPU usage monitor a green graph of CPU usage, in the 'panel' located in the bottom right corner, telling you when that tiny chip's maxed out. But it would be nice to know a little more. Fortunately you can easily add system memory usage and CPU temperature quite easily. The CPU temp is really useful if you're planning to overclock your Pi.

  • Right click on the task bar at the bottom, choosing a bit thats not got anything displayed on it.
  • Select the "Add/Remove Panel Items" and up will pop the "Panel Preferences" window.
  • Select the "Panel Applets" tab.
  • Click "Add" another window will pop up.
  • Scroll down the list you are presented with and select the "Temperature Monitor"
  • Click add, and now you'll have a readout of the temperature the CPU is running at.
  • Repeat the last 3 steps, this time selecting the "Resource monitors"
  • You can now move them where you want by highlighting them individually, and using the up and down buttons to put them into the position you wanted. Personally I have mine in the following order: Resource monitors, CPU temp, CPU usage.
  • Now by default the Resource monitors will show the CPU usage, so highlight the CPU usage monitor, and click the "Edit" button to open the properties window.
  • Swap the radio button from "Display CPU usage" to "Display RAM usage"
  • Click "Close" and "Close" again
Hopefully you'll have seen that theres a fair few things you can keep an eye on with the general running of your system like network status, volume control etc etc. So by using this process, you can get a better feel for what your Pi is doing.

Changing the look of your desktop

The white background as default is a bit bright for my tastes, I'd prefer something a bit easier on the eye. Fortunately this again is easy to change, right click on a clear bit of desktop, select the Desktop preferences. The "Appearance" tab will alter the basics such as background colour, desktop fonts, wallpaper etc. Its not an especially difficult process, so shouldn't need an explanation.


Whilst not that exciting heres how my desktop now looks, after a few seconds tinkering.

Shutting down / Rebooting your Pi

Once you've finished playing its important to shut down correctly, to make sure your SD card doesn't get corrupted (this isn't as bad as it sounds, and has an easy fix) that I'll tell you about soon. A corrupted SD card will either nor run right, or simply not boot at all. So go to the task bar, bottom far right and click the green button. Up will pop the shut down/restart window, select the appropriate option, and wait a few seconds. 

If you have made a change to the software and want to start again, then simply select reboot. If however you want to make a physical change like disconnecting your network cable after getting the WiFi running, use the Shutdown option, until just the red LED is on the Pi board, and all other LED's are off. Disconnect the power lead and make your changes. Plugging in that power lead will restart the Pi. 

All gone horribly wrong?

DONT PANIC! Its unlikely to be a terminal problem.

If you've got a Pi thats stuck/frozen/unresponsive, walk away for 5 mins and leave it alone. The chances are your Pi's just busy. When you come back, you'll probably get a message telling you something is unresponsive, kill the thing thats slowing you down, and move on. If however you get back, and its still doing nothing, just pop out the power lead, and restart. Pulling the power should be seen as a last resort, not a first course of action.

If youre getting nothing at all on power up, check the obvious stuff, is everything connected properly? is the power supply connected properly? Is your power supply working properly? is your SD card properly inserted etc etc etc, its probably something simple.

If you've tweaked a setting and it wont reboot, chances are its a software issue. If you're getting at least the text flow on startup and it fails, then its no biggie your Pi is fine. The fix is quite easy, just skip back a couple of posts, and re-flash your SD card with a fresh image of Raspbian (take it back to the default known working settings you have made), and start again. 

It may be usefull to make notes as to what you do on initial setup of your Pi, so you can get back to your basic configuration. Once I figure it out, I'll be posting about how to make copies of your SD's, so you can have an instant restore with your own basic settings.

So thats a basic run down of your Pi's Raspbian desktop and the Pi. Go experiment, dont worry about breaking your Pi, if it all goes horribly wrong, then just turn off, re-flash your SD and start again.

I have a first simple project I'm going to tackle soon, once I figure it out, I'll pop up some details, and a how i did it guide.


A little light reading

OK, so a bits happened since my first post which was a brief overview about what bits to get should you be interested in getting a Raspberry Pi.

To put things simply those bits have arrived.

So now for a rundown on selecting bits that will work with your Pi, and make things simpler. To put things into a simpler to understand context, when you take a trip to your local computer bits seller, you'll see loads of bits you can plug straight into any Windows based computer. You can be using it within a few minutes of your return, because Windows is a well supported operating system with drivers available to run pretty much everything you can buy.

The Raspberry Pi on the other hand runs for the most part a version of Linux. Whilst Linux has a fairly good support base for most common hardware, if you want to move beyond common items, you may run into difficulties if you are looking to run other more exotic peripherals. Fear not there is an ever expanding list of equipment that has been tested with the Pi. Some stuff works, some doesn't  so to figure out what will work, and therefore is worth buying in the first place, have a look here.

Armed with this info, you can start picking bits that will give you a better chance of success. One point that is worth noting is the power supply you choose. As you start digging into some of the websites for Pi based info, it will become readily obvious that a lot of stability issues relate directly to your choice of power supply. Power supplies as stated from my previous instalment are a common micro USB type, frequently supplied with android smartphones. However not all power supplies are created equally, and some have been categorised as 'Problem' devices. Therefore I'd recommend you stick to the list on power supplies. The one I'm using is a Samsung Galaxy S supply, it was a spare supply to power my girlfriends phone when she stops over with me.

Now for the other stuff I got. Working on the theory that I wanted an install with a minimum of wires, I looked for a wireless keyboard and mouse combo that used a single wireless USB dongle. The Logitech MK260 is a reasonably priced combo wireless mouse and keyboard. It has the useful feature that the wireless dongle is really low powered, so it can run directly plugged into the Pi's USB socket. Coming back to those power supply issues, some of the USB based peripherals and dongles can't run directly as they draw too much power from the Pi.

So thats the power supply, keyboard and mouse dealt with, next to look at SD cards. You may have these lay about the house, but these days, they are really cheap, so check you have a suitable card here. It'll help ensure you have a stable running system when you start tinkering. Mine happen to be 8 Gb Kingston cards, thats what I had to hand, fortunately they are listed as being good cards. Which is why they have been pressed into use in my Pi setup.

Next, whilst I have the opportunity to connect the Pi to the internet via a cable, I'd rather use WiFi. So a bit of research led me to the Edimax EW-7811Un. Its a tiny USB dongle that offers a 802.11b/g/n wireless. Best of all its cheap, low enough power requirements to run directly from the Pi, and is plug and play on the Pi, so it should work with no problems.

The case I got is a clear blue case, partly because it was cheap, partly because it was useful to have a clear case for any photo's I take. As for the rest of the bits, well a spare Cat 5 network lead, HDMI lead and my TV have all been pressed into service as thats what I have to hand.

So thats it for this post, use the lists to pick the bits you need, do some research, and you'll save time and money having to buy twice, if the stuff you get is known to cause problems.

1 January 2013

Starting out, waiting for stuff and things

First post, much waiting.

Ok so I'm new to the Raspberry Pi scene, a noob if you like, but I'm giving it a go. 

I've ordered up my first Raspberry Pi, and I'm waiting for all my bits to arrive. If you've stumbled on this blog by accident, this isn't a blog about cooking badly spelt desserts. The Raspberry Pi is a small, cheap computer with many possibilities like media PC's, weather stations, wireless print servers, all various options if you are so inclined.

When you order a Raspberry Pi, you just get the basic circuit board, you'll need some other stuff to go with it. If you're interested in getting your own, then I'll run through the bits you will need, and the nice bits you might want as we'll, starting with the items you'll need.

You'll need a power supply, fortunately it's a micro USB power supply, the type that commonly powers most modern smart phones, so you may have one of these already. The next thing you'll need, you may already have again is an SD memory card as used in digital cameras etc. The software that runs the Pi all fits on an SD card. I'd go for at least a 4gb card as the basic operating system is 2gb as a download, you can go up to 32gb, but it's debatable weather you need to go this big. For this reason I've picked a couple of 8gb cards. Keep an eye on the blog, as getting the operating system and software onto the SD card will be a future post.

Now we have power and a way of getting software onto we will need input and output stages, so we can make sense of what the Pi is doing. If you're into tinkering with computers, then again you may have some of this stuff already, a standard USB keyboard and mouse, or wireless equivalents will allow you to make use of the Pi. And finally you'll need to see what it's doing, now there's no VGA port, it's strictly HDMI or crappy yellow phono plug so I need an HDMI cable. Word of note on HDMI cables here, don't waste money on expensive HDMI cables, there's no difference in signal output/picture quality as its a digital signal, as shown in this several tests: here, here, and here. This outlines the basic things you'll need to get up and running, now for the stuff that's nice to have.

First things first, the Pi is just a bare circuit board, there's no case, so I ordered one of these, there are expensive ones, but I just opted for a cheap see through blue number. After this, there's network and internet connection to be considered. The Pi has an Ethernet socket, so I've ordered a network cable to plug directly into my broadband router. However you can add wifi by the addition of a cheap USB device. Also to think about is there's only two USB sockets, so it could be useful to have a USB hub. As the power output from the Pi USB sockets is limited, it would be better to look for a powered USB hub. Finally, a cheap card reader that can read those SD cards.

There is a list available of the components that are compatible, and others that are not recommended, you can find it here.

It should be obvious that some of the items listed may be lay about your home already with the exception of the Pi board and a case. For the moment, the bits I need have been ordered variously from eBay and Amazon. There are people shifting 'ultimate pi kits' for around £75. You can buy the bits individually and for about £60 if you need everything, obviously the more stuff you have already, the cheaper it will become.

Next post will be when I get my stuff, and get cracking.