Lets start by popping the Pi in the case you have selected, in my case the board simply clips in, no tools required.

Pop the top on and start connecting it all up, there is a recommended order for doing this. Quickly jump over to the quick start guide for the Pi, the numbers on the picture are the order to do this:
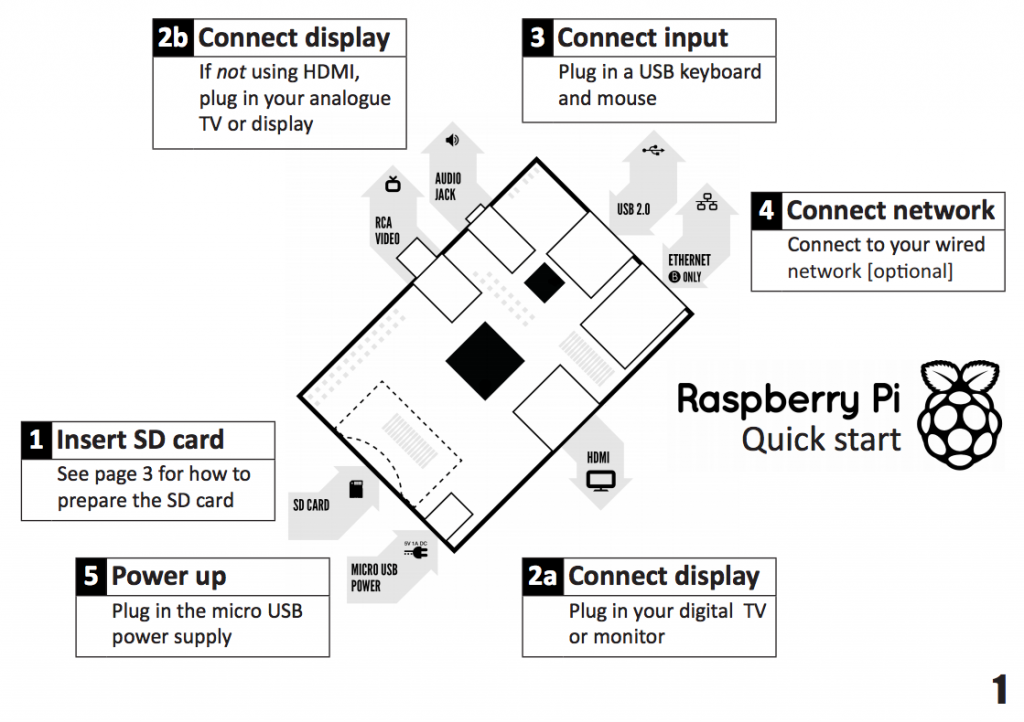
If you follow the link, above you'll be presented with the above image, click on the image for the PDF full quick start guide with the Pi. Hopefully this will be of use.

1: Insert SD card

2: Plug HDMI lead in

3: Plug in USB components (WiFi and Keyboard/Mouse dongles)

4: Plug in Network cable (until the Pi WiFi is working)
A couple of notes at this point relevant to what I'm doing.
- If you're planning on running a WiFi connection, you'll just need a wired connection for the first few minutes of being connected, after that, you can disconnect and go fully wifi once things are initially set up.
- I'm using my Pi connected by HDMI directly to my TV, so the analogue connection will be unused in my notes.
- Finally a note about connecting power. The Pi doesnt have any buttons on it unlike a laptop or desktop computer. Because of this, there is no reset button, or power button. Powering up is by plugging in the power adaptor, turning off is by unplugging, and a reset in the event of a frozen system is by unplugging and pluggung in the power adaptor. For this reason If you are going to do anything physical with your Pi, always disconnect the power adaptor before you do anything, and reconnect last. It'll save a lot of heart ache in the long run.
And thats it, check your SD cards and USB plugs are fully inserted, your network cable and HDMI cables are properly connected to their respective Router and TV. Set your TV to the correct HDMI channel, and get ready to power up. Plug the power connector in, and look at the screen.


5a: Power connected, and the little red LED comes on
5b: Screen shot of my Pi booting up
You should get a Raspberry Logo at the top of the screen, and a load of text rapidly spewing down the screen. Thats your Pi coming to life, wait a short while, and you'll find that there pops up a window with a few options. This is the raspi-config window, for anyone with a mildly geeky thread running through their soul, this is roughly equivalent to a BIOS on a normal computer. As the Pi has no specific BIOS, the settings here are all held on your SD card, and thats the way the Pi configures itself each time.

So you're probably looking at a few options right now, theres a guide to what each one does here. Navigate with the cursor keys, tab key etc. Some can be left alone, some need setting up. Starting with the basic settings, switch the timezone, and locale to represent where you are. If you're in the UK, the Pi is already set for a standard UK keyboard, but there are plenty of pre-loaded options for keyboards, including both national variations, and manufacturers of keyboards. I did switch the manufacturer of my keyboard but left the national settings alone. Check boot behaviour is set to its default setting of "desktop". At this point, go to the update setting, if you feel the need to update, this will need the use of the wired network cable to your router if you choose to do it.
Finally if your SD card is 4Gb or bigger go to the option that says "expand-rootfs". When you made the SD card so it could work on the Pi, the default image is a 2Gb image, this menu option will switch it about so the version of Raspbian installed uses all your SD card. It'll start throwing up a bit more text, then give you a message saying it will do this next time the Pi boots up.
The Password, SSH, Overscan and memory split settings can all be left alone. The overclock settings are essentially up to you. Overclocking is something I'll explore when I've got some heat sinks fitted to my board as my pi seems to run at a steady 45-50 degrees C with no overclock, (this will no doubt be the subject of a future post).
Now using the tab key, move down to "finish" and allow the pi to do its thing.
You should get a load more text flash up, then suddenly the screen will go blank.
Don't panic, the Pi is moving from text based stuff to something a little prettier. A few seconds later, and you'll be in your desktop environment.
Next time, I'll cover getting WiFi running, setting up a few bits, and familiarising ourselves with the desktop environment.
No comments:
Post a Comment